How to Start Embroidery: A Complete Beginner Guide (Hoop, Floss, First Project, Common Mistakes)
Quick Answer
Complete beginner guide to starting hand embroidery — what supplies you actually need, the 6 stitches that cover most beginner patterns, your first finishable project, and the 5 mistakes every new embroiderer makes.
What Is Hand Embroidery and How Is It Different from Cross-Stitch
Hand embroidery (also called surface or freestyle embroidery) is freeform stitching with thread on plain woven fabric — usually cotton or linen — following a printed or transferred design outline. Unlike cross-stitch (counted X-shaped stitches in a grid following a chart), embroidery uses dozens of stitch types: running stitch, backstitch, satin stitch, French knot, stem stitch, lazy daisy, fishbone, fly stitch, and more. The design is drawn or traced onto the fabric and you choose which stitch fills each area. This makes embroidery more artistically expressive than cross-stitch but harder to learn — there is no single 'rule book' to follow. The trade-off: 1–2 hours to learn the first 5 stitches, 10–15 hours to learn 15+ stitches well, and a lifetime to master the artistry. For visual creators who like drawing or painting, embroidery feels natural. For systematic thinkers who like counted work, cross-stitch is the easier entry.
Embroidery Starter Supplies — What You Actually Need
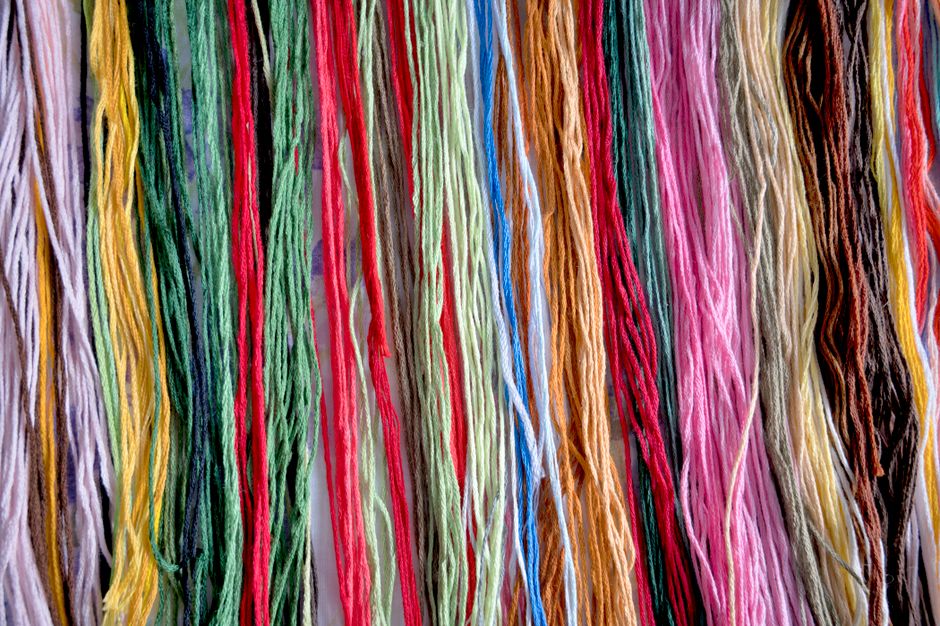
Six essentials, total cost about $15–25. (1) Plain cotton or linen fabric, 8×8 inches, light color (white, ecru, light grey). Quilting cotton or muslin works for beginners. (2) An embroidery hoop, 5–6 inch diameter. Wood or plastic. Holds the fabric drum-tight while stitching. (3) DMC 6-strand cotton floss, 4–6 colors matching your design. (4) Embroidery needles, size 5–8 sharps or crewel needles. Smaller number = larger needle. Size 7 is a versatile starting point. (5) A water-soluble fabric pen or a printed iron-on transfer for your first design. (6) Sharp scissors. SKIP for now: thread organizer (zip-loc bags work), needle threader (use the tail of the floss to push through the eye), magnifier lamp (only needed for very fine 1-strand work), embroidery starter kits (overpriced — buy supplies separately), specialty stitch books (free YouTube tutorials cover everything).
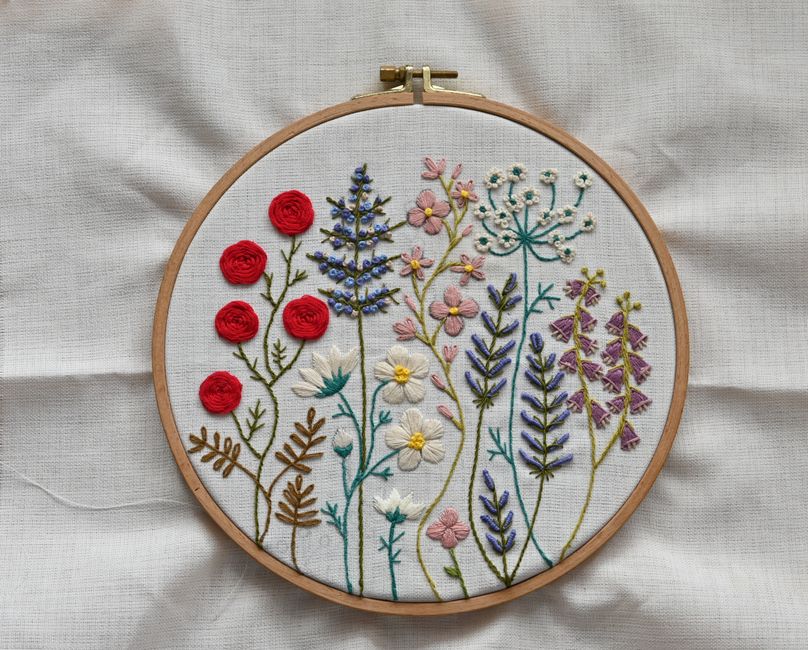
The 6 Essential Embroidery Stitches
These six stitches cover most beginner-to-intermediate embroidery patterns. (1) Running stitch — straight stitches at regular intervals. Used for outlines and dashed lines. Easiest stitch. (2) Backstitch — straight stitches that touch end-to-end forming a continuous line. The workhorse outline stitch. (3) Satin stitch — parallel straight stitches filling an enclosed area. Used for solid color fills (leaves, petals). (4) Stem stitch — interlocking diagonal stitches forming a twisted rope-like line. Used for stems, vines, hand-lettered text. (5) Lazy daisy stitch — a single chain stitch loop forming a teardrop shape. Used for flower petals, leaves, small accents. (6) French knot — a small textured knot tied on the fabric surface. Used for flower centers, eyes, snowflake centers, dotted texture. Master these six and you can stitch most beginner-friendly patterns. Add chain stitch, fishbone, and feather stitch as your second-tier vocabulary.
Your First Embroidery Project (Pick Something Small and Forgiving)
Pick a project under 4 inches wide and using 3–5 stitch types. Recommended first projects: a small hoop-art floral spray (single rose with leaves, ~3 inch design, 6–10 hours, mounted in the embroidery hoop itself), a single-letter monogram in stem stitch (4 inch tall letter, 3–5 hours, gift-worthy), a botanical leaf collection (3 different leaf shapes, 5–8 hours, teaches satin stitch and stem stitch), a sashiko-inspired geometric pattern (running stitch grid in single color, 6–10 hours, teaches consistency), an embroidered handkerchief monogram (small letter on a corner, 2–4 hours, immediate practical use). Avoid for first projects: full landscapes (require shading techniques), portraits (require thread painting expertise), large samplers (overwhelming), anything labeled 'crewel' or 'goldwork' (advanced techniques). Once you have stitched 3–5 small pieces, ramp up to a more ambitious design.
Transferring Embroidery Designs to Fabric
Five common transfer methods. (1) Water-soluble fabric pen — trace the design onto the fabric using a pen that washes out with water. Visible while stitching, removes after washing. Best for light fabrics. (2) Iron-on transfer paper — print or trace the design onto transfer paper, iron the paper face-down onto the fabric, the design transfers as a permanent mirrored line. Best for repeated patterns. (3) Tracing through a window — tape the design behind the fabric, hold against a sunlit window, trace with a regular pencil or fabric pen. Free and works for any design. (4) Carbon paper — sandwich carbon paper between the design and the fabric, trace the design with pressure, the carbon transfers the line to the fabric. Best for dark or thick fabrics where pen does not show. (5) Stick-and-stitch stabilizer — print the design onto a water-soluble adhesive sheet, stick it to the fabric, stitch through both layers, dissolve the stabilizer in water afterward. Best for complex designs or for fabrics that will not take pen or carbon. Stick-and-stitch is the most popular method for modern embroidery — stable, accurate, no marks left behind.
5 Common Beginner Embroidery Mistakes
(1) Stitching with too many strands of floss. 6 strands looks chunky and amateur on most beginner designs. Use 2–3 strands for fine work, 3–4 strands for fills, 6 strands only for chunky decorative styles. (2) Loose hoop tension. The fabric must be drum-tight in the hoop or stitches sag and uneven. Re-tighten the hoop every 30–60 minutes as you stitch. (3) Long thread. Cut floss to 50–60 cm (20–24 inches) per strand. Longer threads tangle, fray, and lose color over time. (4) Skipping the back. Embroidery has a 'wrong side' that should be tidy — no long jumps between stitch areas, no knots, no big tail tangles. Travel under existing stitches, weave in tails along the back of stitched areas. The wrong side should look almost as neat as the right side. (5) Picking too detailed a first design. Beginner enthusiasm picks an intricate floral wreath. It does not finish. Pick something simple and finishable first.
What to Embroider After Your First Project
Once you finish a small first piece, level up gradually. Second project: introduce a new stitch — add French knots and lazy daisies to a botanical design. Third project: try a small portrait or pet silhouette using satin stitch and stem stitch — teaches color shading. Fourth project: try freestyle embroidery on a clothing item (denim jacket back, t-shirt pocket, tote bag) — teaches stitching on garment fabric, which behaves differently from hoop fabric. Fifth project: try a more ambitious filled design — flowers with shaded petals using long-and-short stitch, a fox or bird with detailed feathering, hand-lettered quote with decorative flourishes. Sixth project: try thread painting (painting with thread to create photo-realistic embroidery) or a custom photo-to-embroidery pattern from ArtPatt's embroidery pattern generator — converts any photo into a counted DMC chart suitable for stitched portraiture.
Embroidery Beginner FAQ
How long does embroidery take to learn? About 1–2 hours to learn 5 basic stitches. About 10–15 hours of stitching to develop consistent tension and stitch quality. About 5+ finished projects to feel comfortable choosing stitches independently for new designs. Is embroidery harder than cross-stitch? Slightly. Cross-stitch has one stitch type and a counted chart; embroidery has dozens of stitches and freeform layout. Cross-stitch beginners tend to finish faster; embroidery beginners need more practice projects but unlock more creative range. What is the difference between embroidery and cross-stitch? Cross-stitch is counted X-shaped stitches on grid fabric (Aida) following a chart. Embroidery is freeform stitches (many types) on plain fabric following a drawn outline. Where do I find free embroidery patterns? DMC's free pattern library, designer giveaways on Instagram, and free pattern aggregator sites like Wild Olive and Mr X Stitch. Or generate your own free from any photo using ArtPatt's photo-to-embroidery pattern generator. Can I embroider on clothing? Yes — denim jackets, t-shirts, totes, hats. Use a hoop the right size for the piece, transfer the design with stick-and-stitch stabilizer (works on any fabric), embroider through both layers, dissolve the stabilizer in water afterward. Heavyweight fabrics (denim, canvas) take embroidery best.
Related Articles