Intarsia Knitting for Beginners — Blocks of Color Without Floats
Quick Answer
Intarsia knitting creates isolated color blocks using separate yarn supplies for each section — no floats across the back. This guide covers how intarsia differs from Fair Isle, how to manage bobbins, how to join colors cleanly, and how to convert photos to intarsia charts.
What Is Intarsia Knitting?
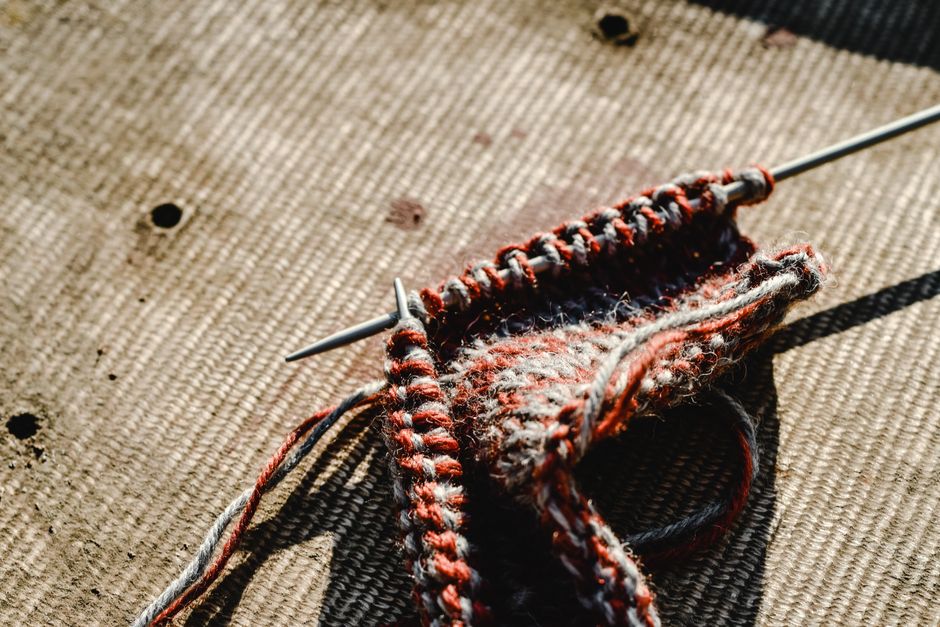
Intarsia is a colorwork knitting technique that creates distinct, isolated color blocks by using separate yarn supplies (bobbins or small balls) for each color section, rather than carrying yarn across the back of the work. The name comes from the Italian woodworking technique of inlaid wood patterns — a fitting analogy because intarsia knitting creates solid, mosaic-like color areas that sit next to each other without overlapping. A classic example: a bold geometric design with a red diamond on a white sweater, where the red section uses its own yarn supply and the white sections on either side each have their own. When you reach a color boundary, you drop one yarn and pick up the next, twisting them around each other to prevent a hole at the join. The back of an intarsia piece has no floats — just dangling yarn tails and short joins.
Intarsia vs Fair Isle vs Duplicate Stitch
Fair Isle (stranded colorwork) carries 2–3 colors across the entire row, creating floats on the wrong side. This works for designs where colors alternate frequently across the row (geometric repeating patterns, stripes, complex allover colorwork). The double-layer fabric from floats adds warmth and structure. Intarsia works for designs with large isolated color blocks — each color region is stitched independently with its own yarn supply. Best for bold graphic designs, portrait-style motifs, and any design where a color appears only in one section of a row rather than repeating. The single-layer fabric drapes more than Fair Isle but hangs correctly because there are no floats pulling the fabric in. Duplicate stitch is a surface embroidery technique: you knit the base fabric in one color, then embroider color onto finished stitches using a tapestry needle. Useful for adding small color elements (eyes, details) after the fact, but not practical for large color areas. ArtPatt's intarsia generator applies the correct 1.4:1 stockinette stitch ratio — knit stitches are wider than they are tall, so an intarsia chart must account for this or the finished motif will appear taller and narrower than intended.
Managing Multiple Yarn Supplies: Bobbins and Butterflies
Each color section in an intarsia row needs its own yarn supply. For a design with 5 color regions across a row, you'll be working from 5 separate lengths of yarn simultaneously. Small plastic bobbins (available at most yarn shops) hold a manageable length of each color and hang at the back of the work without tangling. Yarn butterflies (wound into a figure-eight package) serve the same purpose without requiring extra equipment. Practical tips: start with shorter yarn lengths than you think you'll need — 1–2 meters per bobbin for a medium-sized motif, then add more when needed. Longer tails tangle badly. Work with the knit side facing you as much as possible — when you turn for purl rows, the bobbins will swing to the front, which is easier to manage than you'd expect. Use stitch markers at each color boundary to track where joins occur on each row. For complex intarsia with many colors, a yarn caddy or bowl for each color supply prevents tangling more effectively than bobbins hanging freely.
Joining Colors Without Holes
The critical technique in intarsia is the twist at color boundaries that prevents holes from forming where colors meet. Without it, the yarn loops between stitches would have no connection at the boundary, creating a literal hole in the fabric. On knit side rows: when switching from color A to color B, bring color A to the left (toward you), pick up color B from under color A, and knit the next stitch with B. The yarn tails cross and interlock, preventing a gap. On purl side rows: same principle but from the purl side. Bring A to the right, pick up B from under A, then purl with B. The key error beginners make is forgetting the twist on purl rows — this creates a hole every two rows at every color boundary. Practice the twist on a small swatch before starting a project. After completing the piece, use a tapestry needle to weave in all the short tails from color joins — intarsia produces many more tails than Fair Isle, which is one reason experienced knitters prefer intarsia for large bold designs but Fair Isle for fine allover patterns.
Reading an Intarsia Chart
An intarsia chart is a grid where each square represents one knit stitch, and each color in the chart corresponds to a yarn color in the project. Unlike Fair Isle charts (which typically show a repeating section meant to be worked across the entire row), intarsia charts show the full width of the design area. Read the chart from right to left on right-side (knit) rows, and left to right on wrong-side (purl) rows — the same convention as standard knitting charts. Each row in the chart corresponds to one row of knitting. At each color boundary in the chart, you perform the yarn twist described above. ArtPatt's intarsia generator creates charts that account for the 1.4:1 stockinette stitch aspect ratio — the chart grid squares are slightly wider than they are tall to match the true shape of a knit stitch, so the finished motif matches the chart's intended proportions. If you use a chart not designed for stockinette aspect ratio, the finished piece will appear stretched vertically.
Converting a Photo to an Intarsia Chart
ArtPatt's intarsia knitting generator applies stockinette aspect ratio correction (1.4:1 width-to-height per stitch), automatic confetti reduction, and color simplification to produce clean, workable intarsia charts from photos. Best settings: limit color count to 3–8 colors. Intarsia with more than 8–10 colors becomes unmanageable (too many bobbin tails and boundary twists). Set confetti reduction to Heavy — isolated single-stitch color islands are very difficult to work in intarsia and should be eliminated. Increase contrast slightly to push the image toward bolder, more distinct color regions. Best subjects for intarsia: bold graphic designs with strong color boundaries (animals in silhouette, text, geometric shapes), pet portraits simplified to 5–6 flat colors, landscape horizons with clear color zones. Avoid subjects with fine detail, gradients, or heavily textured backgrounds — the high confetti reduction needed to make these workable tends to simplify the image significantly. Once generated, the chart shows the full motif width; plan your gauge swatch, verify the finished width at your personal stitch gauge, and calculate how many stitches to cast on for the background before and after the motif.
Weaving In Ends and Blocking an Intarsia Piece
Intarsia produces significantly more yarn ends than any other colorwork technique — every color boundary on every row creates two ends (the old color and the new color). For a 100-stitch motif with 6 colors and 80 rows, you can expect 150–300 ends to weave in. The standard advice is to weave in ends as you go — every 10–15 rows, stop and use a tapestry needle to weave in the ends that have accumulated. This distributes the tedious work throughout the project rather than saving it all for the end. Weave each end along the corresponding color area, not diagonally across color boundaries — crossing boundaries makes the woven tail visible on the right side. Weave in two directions (first 2 cm in one direction, then 2 cm back in the other direction, slightly offset) for a more secure finish than a simple straight weave. After weaving all ends, block the piece: wet blocking relaxes the yarn at color joins and eliminates the slight ridging that often appears at intarsia boundaries before blocking.
Common Intarsia Problems and How to Fix Them
Holes at color joins: caused by forgetting the twist on purl rows, or twisting in the wrong direction. The twist must lock the new color under the old color — they interlock to close the gap. Practice on a swatch specifically to check that holes do not form on purl rows. Puckering along color boundaries: the yarn at the join is too tight. Loosen your tension at the exact stitch where colors meet — the join stitch should be the same tension as all surrounding stitches. Tangled bobbins: use shorter yarn lengths (1–2 meters maximum) and unwind only when needed. When turning from a right-side to a wrong-side row, let the work hang and allow the bobbins to unspin naturally — do not chase the tangles. Uneven stitches at boundaries: this is usually a tension issue from the unfamiliar motion of picking up a new bobbin. The stitch immediately after a color join tends to be loose. Pull the new yarn firmly (not tight) after the join stitch and check that it matches the surrounding stitch size.
Related Articles


